
Qwikify your Development with Nx
Originally posted on August 15, 2023 at nx.dev
In the ever-evolving web development landscape, efficiency and modularity have become paramount. This is where Nx and Qwik come into play.
Qwik is a modern web framework that focuses on application performance by reducing the amount of JavaScript that needs to be shipped to the browser. You can learn more about how Qwik achieves this with Resumability here.
Nx is a powerful tool that helps you build extensible and maintainable codebases that scale as your application and team grows. Nx utilises computation cache and workspace analysis to ensure maximum efficiency and developer experience. You can learn more about Nx here.
In this blog post, we'll explore how to combine the strengths of Nx and Qwik to create a todo app. To do this, we'll take advantage of an Nx Plugin that was created by the Qwikifiers team to maximise the integration between Qwik and Nx, called qwik-nx.
You do not necessarily need to use an Nx Plugin for Qwik. Instead, you could use the Qwik CLI to create your application and add Nx later. > This blog post has decided to use the
qwik-nxplugin to leverage better DX provided by the generators offered by the Plugin.
You can learn more about this integration in the video below:
<iframe src="https://www.youtube.com/embed/SY22NaWHv0s?si=eLVdBM5nA9IsTmU2" title="YouTube video player" frameBorder="0" allow="accelerometer; autoplay; clipboard-write; encrypted-media; gyroscope; picture-in-picture; web-share" referrerPolicy="strict-origin-when-cross-origin" allowFullScreen ></iframe>Creating the Workspace
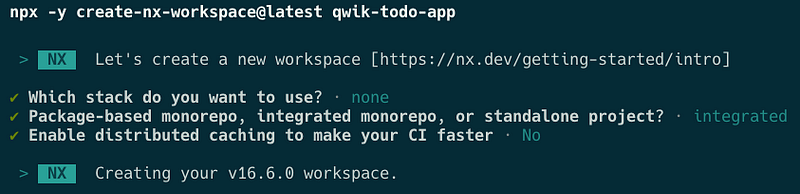
Let's start by setting up our development environment. We'll create an Nx workspace and integrate Qwik into it. Begin by generating an empty integrated workspace:
npx create-nx-workspace@latest qwik-todo-app
You can also use the
presetcreated by theqwik-nxplugin by runningnpx -y create-qwik-nxornpx -y create-nx-workspace@latest --preset=qwik-nx. This will skip a few of the next steps by installing the appropriate dependencies and generating your Qwik app.
The
create-qwik-nxpackage is an example of creating an Install Package with Nx. You can learn more here: https://nx.dev/extending-nx/recipes/create-install-package
Next, navigate into the workspace and install the qwik-nx plugin.
npm install --save-dev qwik-nx
You can view a compatibility matrix for which version of
qwik-nxworks with each version ofnxhere.
Generate the App
One of the benefits of using an Nx Plugin is that it comes with additional features such as automatic migrations, executors to act on your code and generators to scaffold code (like CodeMods).
Now, let's use the application generator provided by qwik-nx to scaffold the todo application:
nx g qwik-nx:app todo
This will generate the starter project that Qwik itself provides in your Nx Workspace. It will also install all the necessary packages to build a Qwik application.
At this point, you can already run the nx serve todo and nx build todo commands to have a feel around of the application that was created.
Generate a new Route
Qwik has another package called Qwik City that uses directory-based routing to handle navigation within your application. You can learn more about directory-based routing with Qwik City here.
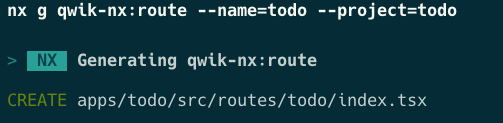
The qwik-nx plugin can help generate new routes within our application. Let's use it to generate a route where we can store our todo logic.
nx g qwik-nx:route --name=todo --project=todo
After running this command, you'll see a new directory and file created in your workspace:
The newly created file should look like this
import { component$ } from "@builder.io/qwik";

export default component$(() => {
  return <div>This is the todo</div>;
});
As you can see, it's very simple, just a standard Qwik Component.
If you run nx serve todo and navigate to http://localhost:4200/todo you can see that the route works and the component renders the content correctly.
Build a Basic UI
We want to build a todo application, so let's add some UI elements to make this look more like an actual todo application.
Update apps/todo/src/routes/todo/index.tsx to match the following:
import { component$ } from "@builder.io/qwik";
import { Form } from "@builder.io/qwik-city";

export default component$(() => {
  return (
    <div>
      <h1>Todos</h1>
      <div>
        <label>
          <input type="checkbox" /> {"My First Todo"}
        </label>
      </div>
      <Form>
        <input type="hidden" name="id" value={1} />
        <input type="text" name="message" />
        <button type="submit">Add</button>
      </Form>
    </div>
  );
});
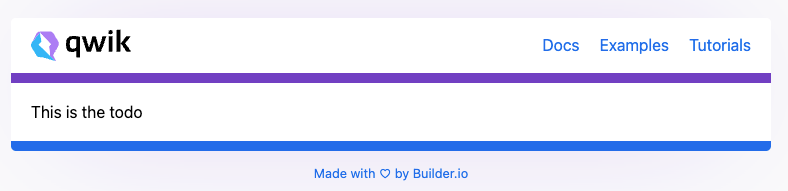
You'll see the page update and look like the following

Awesome!
However, you'll notice that when you click Add, nothing happens! Let's add some logic to store new todos.
Generate a Library
Nx helps you organise your workspace in a modular fashion by creating workspace libraries that focus on specific functionality.
Instead of organising your features into subfolders of your application, with Nx, you'll extract them into workspace libraries (libraries that are not intended to be published, but still used by other libraries and applications in your repository). This helps to create a much stronger boundary between modules and features in your application as libraries have a public API (the index.ts file), allowing you to control exactly what can be accessed by consumers.
You can learn more about defining and ensuring project boundaries here.
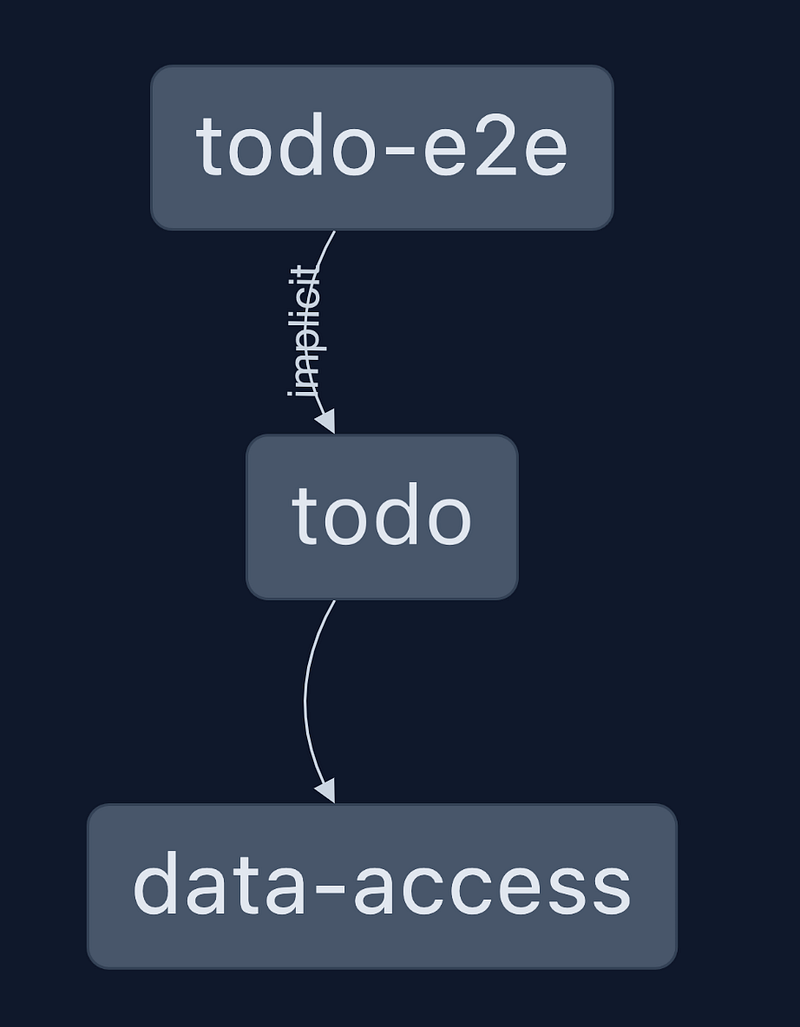
Also, by doing this, you start to build out a project graph for your workspace and your application. Defining your architecture in this manner also helps to reduce the areas in your application that each change affects.
You can learn more about the Project Graph here.
Using this feature of Nx, we can organise the state management of our todo application into its own library, separating the logic from the application itself.
Let's generate a new library with the help of qwik-nx.
nx g qwik-nx:lib data-access
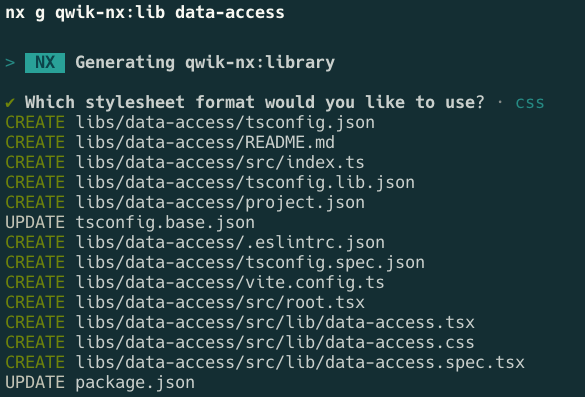
We do not need some of the files that were automatically generated so we can delete them:
libs/data-access/src/lib/data-access.tsx
libs/data-access/src/lib/data-access.css
libs/data-access/src/lib/data-access.spec.tsx
Add a Qwik Context
Qwik uses Contexts to help store state across both the server-side and client-side and across routes within the application.
We'll use a Context to store the todos in the application, but first, let's create a file to store the TS Interfaces we'll use in our application.
Create libs/data-access/src/lib/api.ts and add the following:
export interface Todo {
  id: number;
  message: string;
}
Next, let's create a new file libs/data-access/src/lib/todo.context.tsx and add the following content:
import {
  component$,
  createContextId,
  Slot,
  useContextProvider,
  useStore,
} from '@builder.io/qwik';
import { Todo } from './api';

interface TodoStore {
  todos: Todo[];
  lastId: number;
}
export const TodoContext = createContextId<TodoStore>('todo.context');

export const TodoContextProvider = component$(() => {
  const todoStore = useStore<TodoStore>({
    todos: [],
    lastId: 0,
  });

  useContextProvider(TodoContext, todoStore);

  return <Slot />;
});
This will create our Context and set up a Store within our application to store the todos. Qwik takes advantage of signals to update state and inform the framework of which components need to be re-rendered when the state changes.
You can learn more about how Qwik uses Signals here.
Finally, let's update the public entry point to the library to expose our Context and Interface.
Using the Context
Let's update the root page to add our Context Provider. Open apps/todo/src/root.tsx and add TodoContextProvider after QwikCityProvider in the component tree. Your file should look like the following:
import { component$, useStyles$ } from '@builder.io/qwik';
import {
  QwikCityProvider,
  RouterOutlet,
  ServiceWorkerRegister,
} from '@builder.io/qwik-city';
import { RouterHead } from './components/router-head/router-head';

import globalStyles from './global.css?inline';
import { TodoContextProvider } from '@qwik-todo-app/data-access';

export default component$(() => {
  useStyles$(globalStyles);

  return (
    <QwikCityProvider>
      <TodoContextProvider>
        <head>
          <meta charSet="utf-8" />
          <link rel="manifest" href="/manifest.json" />
          <RouterHead />
        </head>
        <body lang="en">
          <RouterOutlet />
          <ServiceWorkerRegister />
        </body>
      </TodoContextProvider>
    </QwikCityProvider>
  );
});
Update libs/data-access/src/index.ts to match the following:
export * from './lib/todo.context';
export * from './lib/api';
Now that our Context is in place, let's use it in our todo route to manage our todos.
Update apps/todo/src/routes/todo/index.tsx to match the following:
import { component$ } from '@builder.io/qwik';
import { Form } from "@builder.io/qwik-city";
import { TodoContext } from "@qwik-todo-app/data-access";

export default component$(() => {
  const todoStore = useContext(TodoContext);

  return (
    <div>
      <h1>Todos</h1>
      {todoStore.todos.map((t) => (
        <div key={`todo-${t.id}`}>
          <label>
            <input type="checkbox" /> {t.message}
          </label>
        </div>
      ))}
      <Form>
        <input type="hidden" name="id" value={1} />
        <input type="text" name="message" />
        <button type="submit">Add</button>
      </Form>
    </div>
  );
});
Our store has no todos in it when the application starts up, so if you serve the application you will no longer see any todos listed. Let's fix that!
Adding a routeLoader$ to load data on Navigation
Qwik allows you to fetch data when a route is navigated to, allowing you to fetch data before the page is rendered. The data will be fetched on the server before the component is rendered and downloaded to the client.
You can learn more about
routeLoader$here
It does this by providing a function called routeLoader$. We'll use this function to preload our store with some todos that will theoretically exist in a database.
For this blog post, we'll create an in-memory db to store some initial todos.
We'll start by updating our libs/data-access/src/lib/api.ts to add our in-memory DB.
export interface Todo {
  id: number;
  message: string;
}

interface DB {
  store: Record<string, any[]>;
  get: (storeName: string) => any[];
  set: (storeName: string, value: any[]) => boolean;
  add: (storeName: string, value: any) => boolean;
}
export const db: DB = {
  store: {
    todos: [],
  },
  get(storeName) {
    return db.store[storeName];
  },
  set(storeName, value) {
    try {
      db.store[storeName] = value;
      return true;
    } catch (e) {
      return false;
    }
  },
  add(storeName, value) {
    try {
      db.store[storeName].push(value);
      return true;
    } catch (e) {
      return false;
    }
  },
};
Now that we have this, let's use it in our /todo route to load some data when the user navigates to /todo.
Update apps/todo/src/routes/todo/index.tsx to match the following:
import { component$ } from "@builder.io/qwik";
import { Form, routeLoader$ } from "@builder.io/qwik-city";
import { TodoContext, db } from "@qwik-todo-app/data-access";

export const useGetTodos = routeLoader$(() => {
  if (db.get("todos")?.length === 0) {
    db.set("todos", [
      {
        id: 1,
        message: "First todo",
      },
    ]);
  }
  const todos: Todo[] = db.get("todos");
  const lastId = [...todos].sort((a, b) => b.id - a.id)[0].id;
  return { todos, lastId };
});

export default component$(() => {
  const todoStore = useContext(TodoContext);
  const persistedTodos = useGetTodos();

  useTask$(({ track }) => {
    track(() => persistedTodos.value);
    if (persistedTodos.value) {
      todoStore.todos = persistedTodos.value.todos;
      todoStore.lastId =
        todoStore.lastId > persistedTodos.value.lastId
          ? todoStore.lastId
          : persistedTodos.value.lastId;
    }
  });

  return (
    <div>
      <h1>Todos</h1>
      {todoStore.todos.map((t) => (
        <div key={`todo-${t.id}`}>
          <label>
            <input type="checkbox" /> {t.message}
          </label>
        </div>
      ))}
      <Form>
        <input type="hidden" name="id" value={1} />
        <input type="text" name="message" />
        <button type="submit">Add</button>
      </Form>
    </div>
  );
});
When you serve the application, you'll see the first todo is fetched and rendered correctly!
Handle the Form Action to add todos
Qwik also allows you to handle form actions on the server using the routeAction$ API. Let's create the logic to add new todos to the store.
You can learn more about
routeAction$here.
Update apps/todo/src/routes/todo/index.tsx:
import { component$ } from "@builder.io/qwik";
import { Form, routeLoader$ } from "@builder.io/qwik-city";
import { TodoContext, db } from "@qwik-todo-app/data-access";

export const useGetTodos = routeLoader$(() => {
  if (db.get("todos")?.length === 0) {
    db.set("todos", [
      {
        id: 1,
        message: "First todo",
      },
    ]);
  }
  const todos: Todo[] = db.get("todos");
  const lastId = [...todos].sort((a, b) => b.id - a.id)[0].id;
  return { todos, lastId };
});

export const useAddTodo = routeAction$(
  (todo: { id: string; message: string }) => {
    const success = db.add("todos", {
      id: parseInt(todo.id),
      message: todo.message,
    });
    return { success };
  },
  zod$({ id: z.string(), message: z.string() }),
);

export default component$(() => {
  const todoStore = useContext(TodoContext);
  const persistedTodos = useGetTodos();
  const addTodoAction = useAddTodo();

  useTask$(({ track }) => {
    track(() => persistedTodos.value);
    if (persistedTodos.value) {
      todoStore.todos = persistedTodos.value.todos;
      todoStore.lastId =
        todoStore.lastId > persistedTodos.value.lastId
          ? todoStore.lastId
          : persistedTodos.value.lastId;
    }
  });

  return (
    <div>
      <h1>Todos</h1>
      {todoStore.todos.map((t) => (
        <div key={`todo-${t.id}`}>
          <label>
            <input type="checkbox" /> {t.message}
          </label>
        </div>
      ))}
      <Form action={addTodoAction}>
        <input type="hidden" name="id" value={todoStore.lastId + 1} />
        <input type="text" name="message" />
        <button type="submit">Add</button>
      </Form>
      {addTodoAction.value?.success && <p>Todo added!</p>}
    </div>
  );
});
Awesome! We can now add todos to our application!
However, you might have noticed that our file is starting to get very long. Not only that there's a lot of logic in the route file itself. Let's use Nx to separate the logic into the library we created earlier to keep logic collocated.
Improve the Architecture
To separate the logic, create a new file libs/data-access/src/lib/todos.ts and move the logic for loading and adding todos into their own functions:
import { db, Todo } from "./api";

export function getTodos() {
  if (db.get("todos")?.length === 0) {
    db.set("todos", [
      {
        id: 1,
        message: "First todo",
      },
    ]);
  }
  const todos: Todo[] = db.get("todos");
  const lastId = [...todos].sort((a, b) => b.id - a.id)[0].id;
  return { todos, lastId };
}

export function addTodo(todo: { id: string; message: string }) {
  const success = db.add("todos", {
    id: parseInt(todo.id),
    message: todo.message,
  });
  return { success };
}
Next, update libs/data-access/src/index.ts
export * from "./lib/todo.context";
export * from "./lib/api";
export * from "./lib/todo";
Finally, let's update apps/todo/src/routes/todo/index.tsx to use our newly created functions:
import { component$, useContext, useTask$ } from "@builder.io/qwik";
import {
  Form,
  routeAction$,
  routeLoader$,
  z,
  zod$,
} from "@builder.io/qwik-city";
import { addTodo, getTodos, TodoContext } from "@acme/data-access";

export const useGetTodos = routeLoader$(() => getTodos());

export const useAddTodo = routeAction$(
  (todo) => addTodo(todo),
  zod$({ id: z.string(), message: z.string() }),
);

export default component$(() => {
  const todoStore = useContext(TodoContext);
  const persistedTodos = useGetTodos();
  const addTodoAction = useAddTodo();

  useTask$(({ track }) => {
    track(() => persistedTodos.value);
    if (persistedTodos.value) {
      todoStore.todos = persistedTodos.value.todos;
      todoStore.lastId =
        todoStore.lastId > persistedTodos.value.lastId
          ? todoStore.lastId
          : persistedTodos.value.lastId;
    }
  });

  return (
    <div>
      <h1>Todos</h1>
      {todoStore.todos.map((t) => (
        <div key={`todo-${t.id}`}>
          <label>
            <input type="checkbox" /> {t.message}
          </label>
        </div>
      ))}
      <Form action={addTodoAction}>
        <input type="hidden" name="id" value={todoStore.lastId + 1} />
        <input type="text" name="message" />
        <button type="submit">Add</button>
      </Form>
      {addTodoAction.value?.success && <p>Todo added!</p>}
    </div>
  );
});
If you run nx serve todo again, you'll notice that our refactor will not have changed anything for the user, but it has made the codebase more manageable!
Now, if we need to update the logic for loading or adding todos, we only need to retest the library, and not the full application, improving our CI times!
Conclusion
The collaboration between Nx and Qwik has led us to create a todo app that showcases efficient development practices and modular design. By centralizing route logic in a library, we've not only demonstrated the capabilities of Nx and Qwik but also highlighted how this approach can significantly improve cache and CI times.
This journey through Qwik and Nx demonstrates how thoughtful architecture and the right tools can significantly enhance your development experience. So go ahead, Qwikify your development and build amazing web applications with ease!
Further Reading
Learn More
Also, if you liked this, make sure to follow Colum and Nx on X (formerly Twitter) for more!